
1、 Spring简介
spring是轻量级的,非侵入式的框架
spring 是一个轻量级的控制反转(ioc)和面向切面编程(AOP)
1.1、拓展
- Spring Boot
- 一个快速开发的脚手架
- 可以快速开发单个微服务
- 约定大于配置!
- Spring Cloud
1.2、maven依赖
Spring webmvc contains Spring’s model-view-controller (MVC) and REST Web Services implementation for web applications. It provides a clean separation between domain model code and web forms and integrates with all of the other features of the Spring Framework.
1
2
3
4
5
6
| <!-- Source: https://mvnrepository.com/artifact/org.springframework/spring-webmvc -->
<dependency>
<groupId>org.springframework</groupId>
<artifactId>spring-webmvc</artifactId>
<version>5.3.39</version>
</dependency>
|
Spring JDBC » 5.3.39
Spring JDBC provides an abstraction layer that simplifies code to use JDBC and the parsing of database-vendor specific error codes.
1
2
3
4
5
6
| <!-- Source: https://mvnrepository.com/artifact/org.springframework/spring-jdbc -->
<dependency>
<groupId>org.springframework</groupId>
<artifactId>spring-jdbc</artifactId>
<version>5.3.39</version>
</dependency>
|
1.3、弊端
弊端: 配置地狱
2、IOC 控制反转(HelloSpring)
1
2
3
4
5
6
| private UserDao userDao;
//利用set动态注入userDao
public void setUserDao(UserDao userDao) {
this.userDao = userDao;
}
|
userDao的控制权由程序变成了用户(控制反转),程序仅需要提供类和注入方法,不需要适配用户所有的请求;用户自己合理选择类来满足自己的需求。
程序员无需管理对象的创建,降低程序耦合性
2.1、beans.xml(applicationContext.xml)
1
2
3
4
5
6
7
8
| <?xml version="1.0" encoding="UTF-8"?>
<beans xmlns="http://www.springframework.org/schema/beans"
xmlns:xsi="http://www.w3.org/2001/XMLSchema-instance"
xsi:schemaLocation="http://www.springframework.org/schema/beans http://www.springframework.org/schema/beans/spring-beans.xsd">
<bean id="helloid" class="org.zumi.Hello">
<property name="hello" value="hello-value"/>
</bean>
</beans>
|
上述的bean等价于 Hello helloid = new Hello();, id是对象名, class是类的位置, property为属性值复制,调用属性的Setter方法。
value:具体的值,基本数据类型。
ref:引用Spring创建好的bean。
一个bean即为一个被实例的对象。
默认调用无参构造。
2.2、实例化容器(Instantiating a Container)
1
| ApplicationContext context = new ClassPathXmlApplicationContext("beans.xml", "applicationContext.xml");
|
2.3、获取bean
1
2
| Hello hello = context.getBean("helloid", Hello.class);
System.out.println(hello);
|
getbean()返回Object对象
1
| Object getBean(String var1) throws BeansException;
|
2.4、构造器有参构造
2.4.1、Constructor argument type matching
In the preceding scenario, the container can use type matching with simple types if you explicitly specify the type of the constructor argument by using the type attribute, as the following example shows:
1
2
3
4
| <bean id="exampleBean" class="examples.ExampleBean">
<constructor-arg type="int" value="7500000"/>
<constructor-arg type="java.lang.String" value="42"/>
</bean>
|
2.4.2、Constructor argument index
You can use the index attribute to specify explicitly the index of constructor arguments, as the following example shows:
1
2
3
4
| <bean id="exampleBean" class="examples.ExampleBean">
<constructor-arg index="0" value="7500000"/>
<constructor-arg index="1" value="42"/>
</bean>
|
In addition to resolving the ambiguity of multiple simple values, specifying an index resolves ambiguity where a constructor has two arguments of the same type.
The index is 0-based.
2.4.3、Constructor argument name
You can also use the constructor parameter name for value disambiguation, as the following example shows:
1
2
3
4
| <bean id="exampleBean" class="examples.ExampleBean">
<constructor-arg name="years" value="7500000"/>
<constructor-arg name="ultimateAnswer" value="42"/>
</bean>
|
Keep in mind that, to make this work out of the box, your code must be compiled with the debug flag enabled so that Spring can look up the parameter name from the constructor. If you cannot or do not want to compile your code with the debug flag, you can use the @ConstructorProperties JDK annotation to explicitly name your constructor arguments. The sample class would then have to look as follows:
 1
 2
 3
 4
 5
 6
 7
 8
 9
10
11
12
| package examples;
public class ExampleBean {
// Fields omitted
@ConstructorProperties({"years", "ultimateAnswer"})
public ExampleBean(int years, String ultimateAnswer) {
this.years = years;
this.ultimateAnswer = ultimateAnswer;
}
}
|
2.5、Spring配置
2.5.1、别名(alias)
1
2
3
| <alias name="fromName" alias="toName"/>
<alias name="myApp-dataSource" alias="subsystemA-dataSource"/>
<alias name="myApp-dataSource" alias="subsystemB-dataSource"/>
|
2.5.2、bean
1
2
| <bean id="id" class="class" name="name1 name2,name3;name4" scope="scope">
</bean>
|
id为对象名;class为类名;name为别名,一次性可创建多个别名;scope为对象创建模式,默认为单例模式。
| Scope | Description |
|---|
| singleton | (Default) Scopes a single bean definition to a single object instance for each Spring IoC container. |
| prototype | Scopes a single bean definition to any number of object instances. |
| request | Scopes a single bean definition to the lifecycle of a single HTTP request. That is, each HTTP request has its own instance of a bean created off the back of a single bean definition. Only valid in the context of a web-aware Spring ApplicationContext. |
| session | Scopes a single bean definition to the lifecycle of an HTTP Session. Only valid in the context of a web-aware Spring ApplicationContext. |
| application | Scopes a single bean definition to the lifecycle of a ServletContext. Only valid in the context of a web-aware Spring ApplicationContext. |
| websocket | Scopes a single bean definition to the lifecycle of a WebSocket. Only valid in the context of a web-aware Spring ApplicationContext. |
2.5.3、import
1
| <import resource="beans.xml"/>
|
用于团队开发,相同id的bean,位于后面import的bean会覆盖前面的bean。
3、DI依赖注入
3.1、构造器依赖注入
3.1.1、构造器无参注入初始化对象
1
| <bean id="student" class="im.zumi.Hello"></bean>
|
3.1.2、构造器有参注入初始化对象
详见2.1.4、构造器有参构造
3.2、Set方式注入
调用Set方法注入
Student.class
1
2
3
4
5
6
7
8
| private String name;
private Address address;
private String[] books;
private List<String> hobbies;
private Map<String, String> cards;
private Set<String> games;
private String wife;
private Properties prop;
|
Address.class
1
| private String address;
|
beans.xml
 1
 2
 3
 4
 5
 6
 7
 8
 9
10
11
12
13
14
15
16
17
18
19
20
21
22
23
24
25
26
27
28
29
30
31
32
33
34
35
36
37
38
39
40
41
42
43
44
45
| <bean id="address" class="im.zumi.Address">
<property name="address" value="CA,US"/>
</bean>
<bean id="student" class="im.zumi.Student">
<property name="name" value="neuro-sama"/>
<property name="address" ref="address"/>
<property name="books">
<array>
<value>book-1</value>
<value>book-2</value>
<value>book-3</value>
</array>
</property>
<property name="hobbies">
<list>
<value>hobby-1</value>
<value>hobby-2</value>
<value>hobby-3</value>
</list>
</property>
<property name="cards">
<map>
<entry key="key-1" value="value-1"/>
<entry key="key-2" value="value-2"/>
<entry key="key-3" value="value-3"/>
</map>
</property>
<property name="games">
<set>
<value>set-1</value>
<value>set-2</value>
<value>set-3</value>
</set>
</property>
<property name="wife">
<null/>
</property>
<property name="prop">
<props>
<prop key="administrator">[email protected]</prop>
<prop key="support">[email protected]</prop>
<prop key="development">[email protected]</prop>
</props>
</property>
</bean>
|
3.3、第三方注入
3.3.1、p命名空间
p为property的简称,需要导入命名空间»xmlns:p="http://www.springframework.org/schema/p
p方法对应set注入
 1
 2
 3
 4
 5
 6
 7
 8
 9
10
11
12
13
14
15
16
17
18
19
20
| <beans xmlns="http://www.springframework.org/schema/beans"
xmlns:xsi="http://www.w3.org/2001/XMLSchema-instance"
xmlns:p="http://www.springframework.org/schema/p"
xsi:schemaLocation="http://www.springframework.org/schema/beans
https://www.springframework.org/schema/beans/spring-beans.xsd">
<bean name="john-classic" class="com.example.Person">
<property name="name" value="John Doe"/>
<property name="spouse" ref="jane"/>
</bean>
<bean name="john-modern"
class="com.example.Person"
p:name="John Doe"
p:spouse-ref="jane"/>
<bean name="jane" class="com.example.Person">
<property name="name" value="Jane Doe"/>
</bean>
</beans>
|
3.3.2、c命名空间
c为construct的简称,需要导入命名空间»xmlns:c="http://www.springframework.org/schema/c
c方法对应构造器注入
 1
 2
 3
 4
 5
 6
 7
 8
 9
10
11
12
13
14
15
16
17
18
19
20
21
| <beans xmlns="http://www.springframework.org/schema/beans"
xmlns:xsi="http://www.w3.org/2001/XMLSchema-instance"
xmlns:c="http://www.springframework.org/schema/c"
xsi:schemaLocation="http://www.springframework.org/schema/beans
https://www.springframework.org/schema/beans/spring-beans.xsd">
<bean id="beanTwo" class="x.y.ThingTwo"/>
<bean id="beanThree" class="x.y.ThingThree"/>
<!-- traditional declaration with optional argument names -->
<bean id="beanOne" class="x.y.ThingOne">
<constructor-arg name="thingTwo" ref="beanTwo"/>
<constructor-arg name="thingThree" ref="beanThree"/>
<constructor-arg name="email" value="[email protected]"/>
</bean>
<!-- c-namespace declaration with argument names -->
<bean id="beanOne" class="x.y.ThingOne" c:thingTwo-ref="beanTwo"
c:thingThree-ref="beanThree" c:email="[email protected]"/>
</beans>
|
3.4、scope作用域
| Scope | Description |
|---|
| singleton | (Default) Scopes a single bean definition to a single object instance for each Spring IoC container. |
| prototype | Scopes a single bean definition to any number of object instances. |
| request | Scopes a single bean definition to the lifecycle of a single HTTP request. That is, each HTTP request has its own instance of a bean created off the back of a single bean definition. Only valid in the context of a web-aware Spring ApplicationContext. |
| session | Scopes a single bean definition to the lifecycle of an HTTP Session. Only valid in the context of a web-aware Spring ApplicationContext. |
| application | Scopes a single bean definition to the lifecycle of a ServletContext. Only valid in the context of a web-aware Spring ApplicationContext. |
| websocket | Scopes a single bean definition to the lifecycle of a WebSocket. Only valid in the context of a web-aware Spring ApplicationContext. |
3.4.1、单例模式
在单例模式中,所拿到的对象都是同一个。默认作用域。

1
2
3
4
| <bean id="accountService" class="com.something.DefaultAccountService"/>
<!-- the following is equivalent, though redundant (singleton scope is the default) -->
<bean id="accountService" class="com.something.DefaultAccountService" scope="singleton"/>
|
3.4.2、原型模式
在原型模式中,所拿到的每个对象都是独立的。
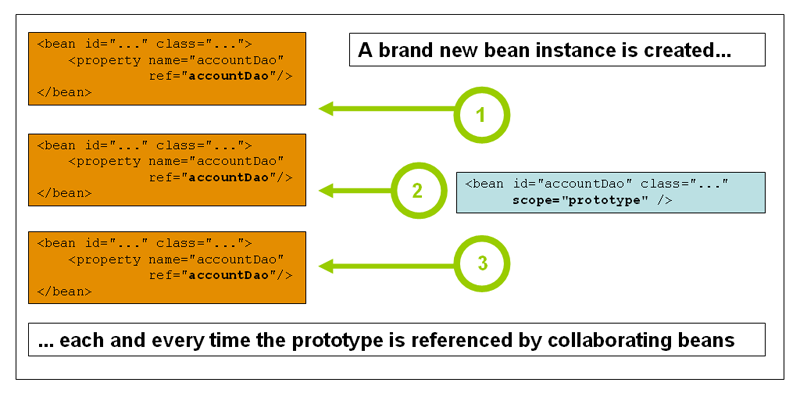
1
| <bean id="accountService" class="com.something.DefaultAccountService" scope="prototype"/>
|
4、自动装配bean
- 自动装配是Spring满足bean依赖的一种方式
- Spring会在上下文中自动寻找,并自动给bean装配属性
在Spring中的三种装配方式
- 在xml中显式配置
- 在java中显式配置
- 隐式的自动装配bean
4.1、通过xml实现自动装配
1
2
3
| <bean id="cat" class="im.zumi.Cat"/>
<bean id="dog" class="im.zumi.Dog"/>
<bean id="person" class="im.zumi.Person" p:name="neuro-sama" p:cat-ref="cat" p:dog-ref="dog"/>
|
4.1.1、通过byName实现
1
2
3
| <bean id="cat" class="im.zumi.Cat"/>
<bean id="dog" class="im.zumi.Dog"/>
<bean id="person" class="im.zumi.Person" p:name="neuro-sama" autowire="byName"/>
|
byName要求待装入bean的属性的setter方法的方法名一致。例如:id为person的bean的SetDog方法装入id为dog的bean。
4.1.2、通过byType实现
1
2
3
| <bean id="cat" class="im.zumi.Cat"/>
<bean id="dog" class="im.zumi.Dog"/>
<bean id="person" class="im.zumi.Person" p:name="neuro-sama" autowire="byType"/>
|
byType要求待装入bean的属性的类型要与已有bean的类型一致,且bean的类型不可重复。(限制较大)
4.2、通过@注解实现自动装配
4.2.1、在xml中引入注解支持
@注解要求首先导入context的命名空间
 1
 2
 3
 4
 5
 6
 7
 8
 9
10
11
12
| <?xml version="1.0" encoding="UTF-8"?>
<beans xmlns="http://www.springframework.org/schema/beans"
xmlns:xsi="http://www.w3.org/2001/XMLSchema-instance"
xmlns:context="http://www.springframework.org/schema/context"
xsi:schemaLocation="http://www.springframework.org/schema/beans
https://www.springframework.org/schema/beans/spring-beans.xsd
http://www.springframework.org/schema/context
https://www.springframework.org/schema/context/spring-context.xsd">
<context:annotation-config/>
</beans>
|
4.2.2、annotation-config和component-scan的区别
<context:annotation-config/>注册了一组注解处理器bean。没有它,@Autowired就是普通注解,Spring不提供相应支持。
| 注解 | 处理器 |
|---|
@Autowired | AutowiredAnnotationBeanPostProcessor |
@Resource | CommonAnnotationBeanPostProcessor |
@PostConstruct | CommonAnnotationBeanPostProcessor |
@PreDestroy | 同上 |
@PersistenceContext | 对应处理器 |
<context:annotation-config/>负责解析在xml显式定义的bean,但不能创建bean。
<context:component-scan base-package="com.example"/>自动扫描注册@Component/@Service/…为bean,同时包含<context:annotation-config/>的功能。
有 component-scan 就不需要 annotation-config
1
2
3
| @Component
public class UserService {}
// 需要在xml中使用<context:component-scan base-package="com.example"/>
|
在Spring Boot中可以直接使用注解@SpringBootApplication,内部包含@ComponentScan和自动注册注解处理器。
4.2.3、@Autowired
@Autowired字段注入
1
2
3
4
5
| @Autowired
private Dog dog;
@Autowired
private Cat cat;
|
不需要为dog和cat提供setter方法,Spring通过反射将对应的bean直接注入到该字段,完全绕过了setter。
例如:
1
2
3
| Field field = Person.class.getDeclaredField("dog");
field.setAccessible(true);
field.set(person, dogBean);
|
字段注入的问题:
- 依赖不明显
- 不能
final - 不利于单元测试
- 不利于不可变对象
@Autowired Setter注入
1
2
3
4
5
6
| private Dog dog;
@Autowired
public void setDog(Dog dog) {
this.dog = dog;
}
|
setter方法是必须的,Spring调用setter完成注入。
@Autowired构造器注入
 1
 2
 3
 4
 5
 6
 7
 8
 9
10
11
| @Component
public class Person {
private final Dog dog;
private final Cat cat;
public Person(Dog dog, Cat cat) {
this.dog = dog;
this.cat = cat;
}
}
|
@Autowired 可以省略,Spring 会自动使用这个构造器。再有多个构造器时,需要使用@Autowired指明构造器。
@Qualifier
当同一类型存在多个 Bean 时,@Qualifier 用来“点名”要注入哪一个。
1
2
3
| @Autowired
@Qualifier("husky")
private Dog dog;
|
只导入id为husky的bean,如果没有则抛出异常。
@Qualifier的优先级高于一切默认设置。
Spring注入时的优先级如下:
1
2
3
4
5
| @Qualifier
↓
参数名 / 字段名
↓
@Primary
|
@Qualifier的三种注入方法。
- 字段注入
1
2
3
| @Autowired
@Qualifier("husky")
private Dog dog;
|
- 构造器注入(推荐)
1
2
3
| public Person(@Qualifier("husky") Dog dog) {
this.dog = dog;
}
|
- Setter 注入
1
2
3
4
| @Autowired
public void setDog(@Qualifier("husky") Dog dog) {
this.dog = dog;
}
|
@Autowired(required=false)对比@Nullable
1
2
| @Autowired(required = false)
private UserService userService;
|
如果容器里 有 UserService → 注入,如果 没有 → 不注入,字段为 null,不会抛异常,Spring 能正常启动,这个 Bean 可有可无。
@Nullable 来自:org.springframework.lang.Nullable或 javax.annotation.Nullable,不影响 Spring 是否注入 Bean,只表示这个地方允许为null。
1
2
3
| public OrderService(@Nullable UserService userService) {
this.userService = userService;
}
|
构造器参数中@Nullable + 单构造器,Spring 会自动把它当作“可选依赖”。
4.2.4、@Component
@Component基本内容
@Component把一个普通 Java 类交给 Spring 容器管理,变成 Bean。
在Spring的beans.xml启用<context:component-scan base-package="com.example"/>或在Spring Boot中使用@SpringBootApplication。
@Component基本使用
1
2
3
| @Component
public class Dog {
}
|
bean的默认名称为类名的首字母小写,例如dog。
也可以自定义bean名:
1
2
| @Component("myDog")
public class Dog {}
|
@Component扩展
它们功能完全一样,只是语义不同:
| 注解 | 用途 |
|---|
@Component | 通用组件 |
@Service | 业务逻辑层 |
@Repository | DAO / 持久层(还会做异常转换) |
@Controller / @RestController | Web 层 |
@Value
给bean的字段注入普通值(字符串,数字,表达式,配置文件里的值)而不是其它的bean。
@Value的三种常见用法
- 注入字面量
1
2
3
4
5
| @Value("Tom")
private String name;
@Value("18")
private int age;
|
- 注入配置文件
1
2
3
4
5
6
7
| dog.name=旺财
dog.age=3
@Value("${dog.name}")
private String name;
@Value("${dog.age}")
private int age;
|
- Spring Boot:自动支持
- 传统 Spring:需要
PropertySourcesPlaceholderConfigurer - @Value使用默认值
1
| @Value("${dog.name:defaultName}")
|
- 使用 SpEL 表达式
1
2
3
4
5
| @Value("#{2 * 3}")
private int result;
@Value("#{systemProperties['os.name']}")
private String os;
|
@Value的三种注入方式
- 字段
1
2
| @Value("${dog.name}")
private String name;
|
- 构造器参数(推荐)
1
2
3
| public Dog(@Value("${dog.name}") String name) {
this.name = name;
}
|
- 方法参数
1
2
3
4
| @Autowired
public void setName(@Value("${dog.name}") String name) {
this.name = name;
}
|